How To Share Internet Connection With Android via PC
How To Share Internet Connection With Android via PC

InShort Viral: Today we are going to share the simplest strategy that will share your internet connection with your Android mobile computer, without installing an external application.
Having a computer connected to the Internet, you can easily share the network with other computers, mobile and tablets. Unfortunately, this form of links is rarely known, but your office or workplace can not be shared with a wireless network or it can be very useful without offering free offers, such as hotels where you simply do not want to pay for the internet but it is for devices connected to the device. You have to pay.
How To Share Internet Connection With Android Mobile Via Your Computer
Today we are going to share an awesome strategy for you to share the Internet with your Android devices from your PC computer. If you do not have a WiFi adapter for internet connection exchange, you will have to buy a WiFi adapter, WiFi adapter is usually cheap and easy to use. So now I'm going to share with you the tricky part that allows you to share internet between Windows 7, 8 or 10 from a computer or laptop. So, how to connect to the internet, let's get to know the full guide of your Android mobile through your computer's WiFi.
How to connect to The Internet in your Android mobile via Laptop WiFi
1. Go to the first start button and you need to run the CMD. And you right click on CMD and click on "Run as administrator"

2. Now type “netsh wlan set hostednetwork mode=allow ssid=NAME key=PASSWORD”
Without quotation marks, and hit enter. You need to enter your desired password on "NAME" and the username "PASSWORD". Remember that your password must be at least 8 digits long or it will refuse the command. You have to wait a bit while your network is ready. After that cmd will show you that your passphrase is being successfully changed, which means that your network has been created.
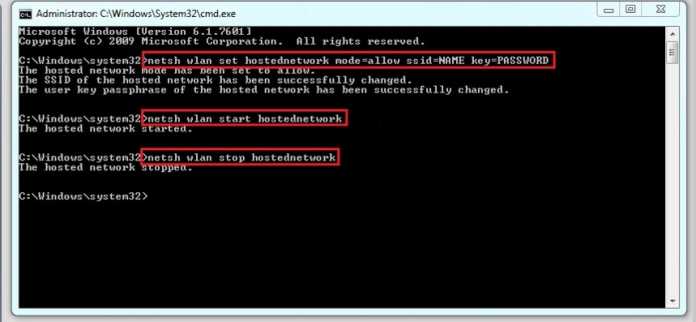
3. Now without the quote type, type "hosted network started at Netskets" and press enter button. CMD will send you an instant message about the start of your hosted network shown in screenshot
4. After completing the CMD part you have to close it and then go to "Open Network and Share Center" and then click on Change Adapter Settings. You can update the new adapter that will be named as "Microsoft Virtual WiFi Minip Adapter". Here you want to select the default LAN connection on your computer which you use most and go to "Properties" under the "Shared" tab you need. Select "Allow other network users to connect via this computer's Internet connection" option, and select the newly created adapter under the home networking connection. And then click OK
4. After completing the CMD part you have to close it and then go to "Open Network and Share Center" and then click on Change Adapter Settings. You can update the new adapter that will be named as "Microsoft Virtual WiFi Minip Adapter". Here you want to select the default LAN connection on your computer which you use most and go to "Properties" under the "Shared" tab you need. Select "Allow other network users to connect via this computer's Internet connection" option, and select the newly created adapter under the home networking connection. And then click OK

Now if you want to disable the newly created WiFi connection, you can change the Network and Sharing Center> Adaptor settings and disable the newly created hosting network. Or else you can type "Nets Wally Stop Hosted Networkwork" at the command prompt, which is appropriate for you to apply properly.

Safeguard and safeguard the mentioned methods so that you can take full advantage of sharing the Internet without any external application with your Android mobile phone.


![The Amazing Spider-Man 2 v1.2.2 Apk + Obb Data [Full Version] Android](https://blogger.googleusercontent.com/img/b/R29vZ2xl/AVvXsEjQJMnLhjrp0gDrmb6NgybKXV6azXZ8S65fYLngAlVj-zmrE4y0Njg9uc1ygu8POnjny2B1jcgxw1ABMLSM1IXlngZpuS5EM4bEg3V9PMyjCwe4JS36aqDtmnxTy28oAaI1mbTFsawLvwEy/s72-c/The+Amazing+Spider-Man+2+Apk.jpg)


![The Amazing Spider-Man 2 v1.2.2 Apk + Obb Data [Full Version] Android](https://blogger.googleusercontent.com/img/b/R29vZ2xl/AVvXsEjQJMnLhjrp0gDrmb6NgybKXV6azXZ8S65fYLngAlVj-zmrE4y0Njg9uc1ygu8POnjny2B1jcgxw1ABMLSM1IXlngZpuS5EM4bEg3V9PMyjCwe4JS36aqDtmnxTy28oAaI1mbTFsawLvwEy/w72-h72-p-k-no-nu/The+Amazing+Spider-Man+2+Apk.jpg)
No comments